
공통 [10.3 리오][업데이트 2] Firebase 안드로이드 앱 푸쉬 알림 - 10.3.2에서 FCM 수신 설정하기
2019.08.21 09:08
Delphi, C++Builder 및 RAD 스튜디오 10.3.1을 사용해 파이어몽키 안드로이드 앱에서 Firebase 푸시 알림 지원하는 과정은 아래 링크를 참고하세요:
업그레이된 RAD 스튜디오 10.3.2에서는 더욱 더 간소화된 과정으로 Firebase 푸시 알림을 사용 하실 수 있습니다.
- Firebase 패치 제공 (10.3.2에 포함)
- 알림 아이콘 개선
- Firebase 버전 지원 요구 사항에 맞게 Google Play 서비스 및 지도 업데이트
Firebase에서 애플리케이션을 활성화하려면, 다음 3단계로 작업을 진행해야 합니다.
- Firebase 프로젝트를 만들고 파이어몽키 프로젝트를 Google Firebase 콘솔에 등록
- 파이어몽키 프로젝트를 새로 만들거나 기존의 프로젝트에 RAD 스튜디오 10.3.2 푸시 알림 구성
- GCM(Google Cloud Messaging) 대신 Firebase를 지원하도록 파이어몽키 프로젝트 변경
Firebase 프로젝트 생성 및 Firebase 콘솔에 파이어몽키 프로젝트 등록
1. Google Firebase 콘솔(https://console.firebase.google.com/)에 접속 후 [New Project]를 클릭 합니다.
2. 프로젝트 이름은 임의로 설정(예> FirebaseApp)하고 [Continue] 버튼을 클릭합니다.
3. Set up Google Analytics for my project 를 선택하고 [Continue] 버튼을 클릭합니다.
4. 구글 분석 계정을 하나 만들어서 입력하시고 [Create Project] 버튼을 클릭합니다.
5. 프로젝트가 생성된 후 [Continue] 버튼을 클릭합니다.
6. 프로젝트 생성 후 Project Overview 옆의 톱니바퀴 아이콘 클릭 후 [Project Settings] 메뉴를 선택해 프로젝트 설정 화면으로
이동합니다.
- Google Cloud Platform(GCP) Resource Location을 가장 가까운 asia-northeast1 추천합니다.
- Support Email도 입력해 주십시오.
7. 안드로이드 아이콘을 클릭하여 "Android 앱에 Firebase 추가 화면"으로 이동합니다.

8. 앱 등록 단계에서 Android 패키지 이름을 지정 후 [Register] 버튼을 클릭합니다.
- 파이어몽키 앱의 기본 패키지 이름은 com.embarcadero.프로젝트이름 입니다.
- 파이어몽키 프로젝트를 FirebaseApp으로 생성 시 com.embarcadero.FirebaseApp으로 생성합니다.

9. 구성 파일(google-services.json)을 다운로드 합니다.

다운로드 후 [다음] 버튼 클릭 후 이후 단계는 건너 뛰기를 선택합니다.
파이어몽키 프로젝트에 푸시 알림 구성
10. 파이어몽키 프로젝트를 생성(또는 기존 프로젝트 오픈) 합니다.
11. Firebase 콘솔에 등록된 프로젝트 이름과 일치하도록 FMX 프로젝트 이름을 변경합니다.
(이 예제에서는 FirebaseApp으로 설정합니다.)

12. 델파이 개발환경에서 Project > Options... > Application > Services 에서 Import 버튼을 클릭하여 google-services.json을 추가합니다.
아래와 같이 libraries를 확장해 보시면 파일 들이 추가 된 것을 확인 하실 수 있습니다.

13. Project > Options... > Application > Entitlemenet List 탭에서 Receive Push Notifications 옵션을 True로 지정합니다.
14. Firebase 이벤트 로그를 표시하기 위해 TMemo 컴포넌트를 폼에 추가하고, MemoLog로 이름을 변경합니다.
15. uses절 System.PushNotification을 추가하고 implemetation uses에 다음과 같이 추가합니다.
(안드로이드 플랫폼에서만 사용시에는 $ifdef 문은 생략하셔도 됩니다)
implemetation
uses
{$ifdef android}
FMX.PushNotification.Android;
{$endif}
16. 필요한 변수와 이벤트를 private 영역에 선언합니다.
private
FDeviceId: string;
FDeviceToken: string;
procedure OnServiceConnectionChange(Sender: TObject;PushChanges: TPushService.TChanges);
procedure OnReceiveNotificationEvent(Sender: TObject;const ServiceNotification:TPushServiceNotification);
17. 다음 Form의 OnCreate 이벤트를 추가해 푸시 알림 서비스 초기화 및 연결을 위한 코드를 구현합니다.
procedure TForm1.FormCreate(Sender: TObject);
var
PushService: TPushService;
ServiceConnection: TPushServiceConnection;
Notifications: TArray<TPushServiceNotification>;
begin
PushService :=
TPushServiceManager.Instance.GetServiceByName(TPushService.TServiceNames.GCM);
ServiceConnection := TPushServiceConnection.Create(PushService);
ServiceConnection.Active := True;
ServiceConnection.OnChange := OnServiceConnectionChange;
ServiceConnection.OnReceiveNotification := OnReceiveNotificationEvent;
FDeviceId :=
PushService.DeviceIDValue[TPushService.TDeviceIDNames.DeviceId];
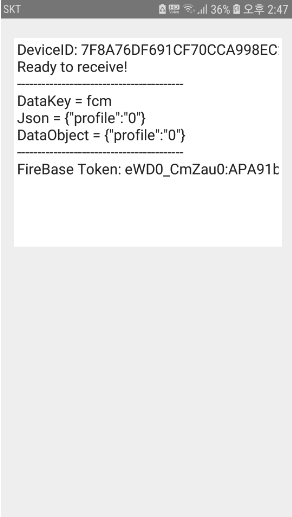
MemoLog.Lines.Add('DeviceID: ' + FDeviceId);
MemoLog.Lines.Add('Ready to receive!');
// Checks notification on startup, if application was launched fromcold start
// by tapping on Notification in Notification Center
Notifications := PushService.StartupNotifications;
if Length(Notifications) > 0 then
begin
MemoLog.Lines.Add('-----------------------------------------');
MemoLog.Lines.Add('DataKey = ' + Notifications[0].DataKey);
MemoLog.Lines.Add('Json = ' + Notifications[0].Json.ToString);
MemoLog.Lines.Add('DataObject = ' +
Notifications[0].DataObject.ToString);
MemoLog.Lines.Add('-----------------------------------------');
end;
end;
18. 위에 선언된 2개의 이벤트 핸들러를 각각 다음과 같이 작성합니다.
procedure TForm1.OnReceiveNotificationEvent(Sender: TObject;const ServiceNotification:TPushServiceNotification);
var
MessageText: string;
begin
MemoLog.Lines.Add('-----------------------------------------');
MemoLog.Lines.Add('DataKey = ' + ServiceNotification.DataKey);
MemoLog.Lines.Add('Json = ' + ServiceNotification.Json.ToString);
MemoLog.Lines.Add('DataObject = ' +
ServiceNotification.DataObject.ToString);
MemoLog.Lines.Add('---------------------------------------');
end;
procedure TForm1.OnServiceConnectionChange(Sender: TObject;
PushChanges: TPushService.TChanges);
var
PushService: TPushService;
begin
PushService :=
TPushServiceManager.Instance.GetServiceByName(TPushService.TServiceNames.GCM);
if TPushService.TChange.DeviceToken in PushChanges then
begin
FDeviceToken :=
PushService.DeviceTokenValue[TPushService.TDeviceTokenNames.DeviceToken];
MemoLog.Lines.Add('FireBase Token: ' + FDeviceToken);
Log.d('Firebase device token: token=' + FDeviceToken);
end;
if (TPushService.TChange.Status in PushChanges) and (PushService.Status
= TPushService.TStatus.StartupError) then
MemoLog.Lines.Add('Error: ' + PushService.StartupError);
end;
Firebase Cloud Messaging 전송테스트
19. FMX 앱을 안드로이드 장비에 배포합니다. 실행 시 앱은 자동으로 Firebase에 등록되고, 로그에 디바이스 토큰이 표시됩니다.
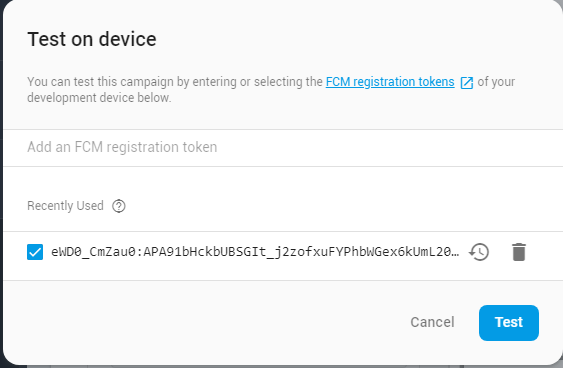
장비에 푸시메시지를 전송하려면 Firebase 토큰이 필요합니다. 로그에 표시된 토큰을 복사합니다.
20. 브라우저에서 Google Firebase 콘솔(https://console.firebase.google.com/) 접속 후 앞에서 만든 프로젝트를 선택합니다. 사이드 메뉴의 "성장 > Cloud Messaging" 메뉴를 선택 후 [Send your first message] 버튼을 클릭합니다.

21. 알림의 제목과 텍스트를 입력하고, [테스트 메시지 전송] 버튼을 클릭합니다.

22. 위에서 선택한 Firebase 토큰을 "FCM 등록 토큰 추가" 항목에 입력 후 (+) 버튼 클릭해 토큰을 추가합니다.
[테스트] 버튼을 눌러 메시지를 전송합니다.
23. 아래와 같이 해당 토큰을 재사용하는 경우 체크 한 후 [Test] 버튼을 눌러 메시지를 전송합니다.
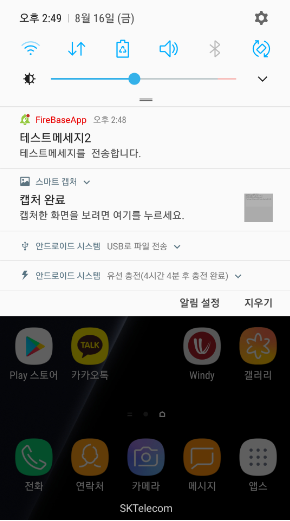
다음 화면과 같이 전송한 메시지가 안드로이드 화면에 표시되는 것을 확인할 수 있습니다. 또한 메시지는 안드로이드 알림센터에도 표시됩니다.
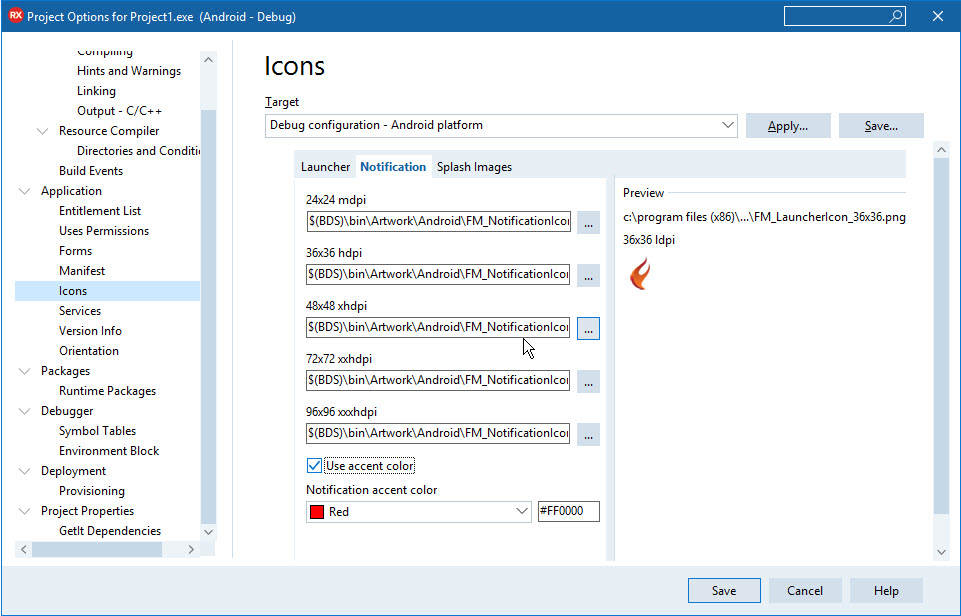
팁 Project > Options... > Application > Icons 에서 사옹자 지정 알림 아이콘과 액센트 색상을 지정하실 수 있습니다.
관련글 & 10.3 리오의 업데이트 버전들
댓글 1
-
silkroad99
2021.03.30 15:25
FCM으로 이미지 전송은 어떻게 하는건가요