공통 iOS9의 새로운 기능인 "App transport Security" 예외 허용을 위한 Info.plist xml 수정방법
2015.10.01 14:24
이 글은 엠바카데로의 David I 블로그 글을 인용 및 참고해 작성한 글입니다. 자세한 내용은 원글을 통해서 확인하시기 바랍니다.
iOS9의 App Transport Security 예외 허용하기
iOS9에서 애플은 내부적으로 HTTP 프로토콜 요청하는 응용프로그램을 제한하는 새로운 "App Transport Security" 기능을 추가했습니다.
App Transport Security
- 애플 App Transport Security 기술문서:https://developer.apple.com/library/prerelease/ios/technotes/App-Transport-Security-Technote/
“App Transport Security is a feature that improves the security of connections between an app and web services. The feature consists of default connection requirements that conform to best practices for secure connections. Apps can override this default behavior and turn off transport security. Transport security is available in iOS 9.0 or later, and in OS X v10.11 and later.”
간단하게 요약하면 iOS9 부터는 HTTP(암호화 되지 않은 통신)에 대해서 OS 단에서 제한을 한다는 내용입니다.
즉 RAD Studio로 TWebBrowser, AppAnalytics, Indy Http 등으로 HTTP(HTTPS가 아닌)를 호출할 경우 이상 동작할 수 있습니다.
애플에서는 Info.plist를 설정해 앱에서 HTTP를 사용할 수 있도록 허용합니다.
이 글에서는 RAD Studio에서 Info.plist 옵션을 설정하는 방법과 RAD Studio 10 시애틀 샘플소스코드 프로젝트에 대한 링크를 제공합니다.
❑ Info.plist 편집 방법
Info.plist 파일은 프로젝트를 빌드 할때마다 다시 생성됩니다. 그렇기 때문에 Info.plist 파일을 직접 편집하기 위해서는 예를들어 프로젝트의 디렉토리와 같은 위치에 Info.plist 파일을 복사 후 복사한 파일을 편집해야 합니다.
(Info.plist 파일은 iOS Device - 32 bit / 64 bit로 타겟 선택 후 프로젝트를 빌드하면 프로젝트 저장 경로의 하위에 생성됩니다.
예> \iOSDevice32\Debug\Project1.Info.plist)
복사 후 편집한 Info.plist 파일은 Project > Deployement 기능을 통해 별도로 배포해야합니다.
(이 과정은 이 글의 후반부에 다시 안내합니다.)
❑ App Transport Security 옵션 설정
옵션1. "App Transport Security" 비활성화
 <key>NSAppTransportSecurity</key>
 <dict>
  <key>NSAllowsArbitraryLoads</key><true/>
 </dict>
옵션2. 'App Transport Security" 예외 도메인 등록
                 <key>NSAppTransportSecurity</key>
                 <dict>
                   <key>NSExceptionDomains</key>
                   <dict>
                     <key>appanalytics.embarcadero.com</key>
                     <dict>
                       <key>NSExceptionAllowsInsecureHTTPLoads</key><true/>
                     </dict>
                   </dict>
                 </dict>
Info.plist 파일의 제일 마지막으로 이동 후 </dict> 태그 바로 위에 위의 코드를 추가합니다.
이 방법은 특정 도메인(appanalytics.embarcadero.com)으로 접속하는 연결에 대해 보안이 적용되지 않은 HTTP 통신을 허용하도록 설정하는 방법입니다.
❑ Info.plist 배포 설정
앞에서 수정한 Info.plist 파일을 기본 Info.plist를 대신하도록 배포설정해야 합니다. 이 과정은 iOS Device 32 bit와 64 bit 모두에서 진행해야 합니다.(32 비트와 64비트 버전이 약간 다르다는 것을 주의)
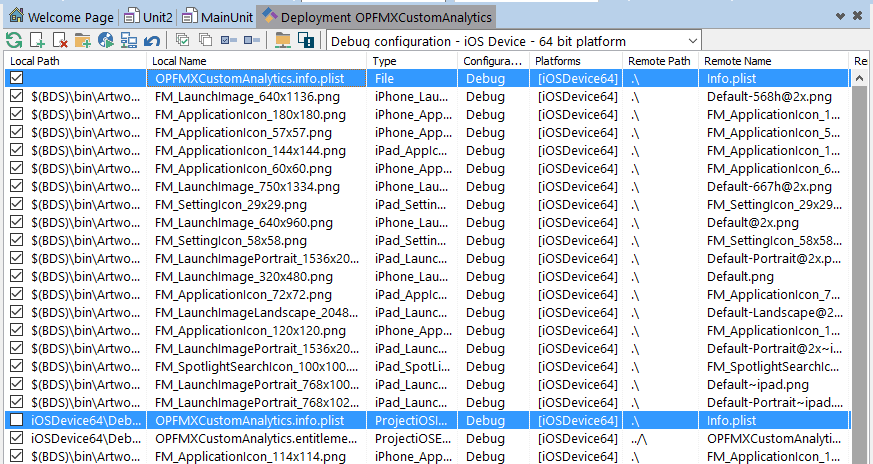
배포 관리자(Project > Deployement)로 이동 후 편집한 Info.plist 파일을 추가(Add file)합니다.
아래 그림과 같이 기본 Info.plist 파일을 선택 해제합니다.(배포 대상에서 제외)
위와같이 배포 설정후 앱을 배포하면 변경된 설정의 Info.plist가 배포됩니다.


위 방법을 자동화 해주는 무료툴이 TMS 사이트에서 제공 됩니다.
https://www.tmssoftware.com/site/blog.asp?post=317